Spam Problem? Learn How to Configure and Leverage cPanel Filters
Spam is not only annoying, but can also be a vector for malware delivery and theft of confidential information. Use cPanel to limit spam that makes it to your inbox.
Nobody likes spam. They are unsolicited emails that clutter your inbox, and are often used by malicious individuals to scam unsuspecting users and spread malware. While email fundamentally altered how we communicate, it also brought on new challenges stemming from its abuse.
Users with self-hosted emails tend to receive a significant amount of spam if their hosting accounts are not configured appropriately.
cPanel ships with out-of-the-box tools that can help you limit the amount of unsolicited email that sneaks into your inbox. Follow the steps below to start filtering spam with cPanel.
Step 1 – Enable Spam Assassin
Apache Spam Assassin is an open-source tool that plays the dual role of classifying and filtering email while blocking spam. The tool analyses subject lines, body text and DNS blacklists. Turning it on can significantly reduce the amount of spam email that you see in your inbox. To enable SpamAssassin, navigate to “Spam Filters” from the cPanel homepage.

Enable Apache Spam Assassin by toggling the switch marked “Process new emails and mark them as spam” to the ON position. Do the same for the Spam Box option as shown below.

Please note that “Auto-Delete” is not enabled for spam because it is possible that some emails may be falsely flagged as spam for various reasons. It is recommended that you keep the feature turned off and instead use the “Spam Box” to allow you to recover messages from your spam folder.
Step 2 – Configure Global Email Filters
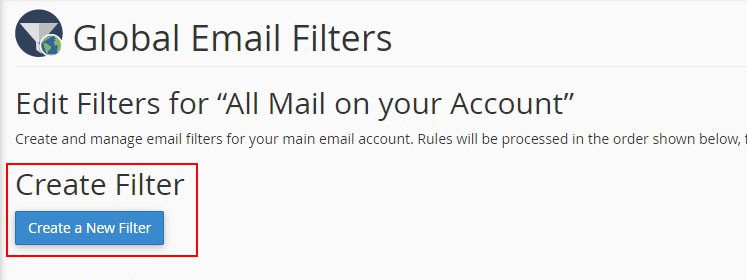
Navigate back to the cPanel homepage and then to “Global Email Filters”. This feature allows you to configure global rules that will apply to all email accounts associated with your account. You can also do the same for individual accounts by using the “Email Filters” function, but please not that you may find it tedious to manage filtering rules for each account, one by one.

The next step is configuring the rules that will be the backbone of your email filters. On the next screen, you will create filters depending on your needs. Click the “Create a New Filter” button to proceed.

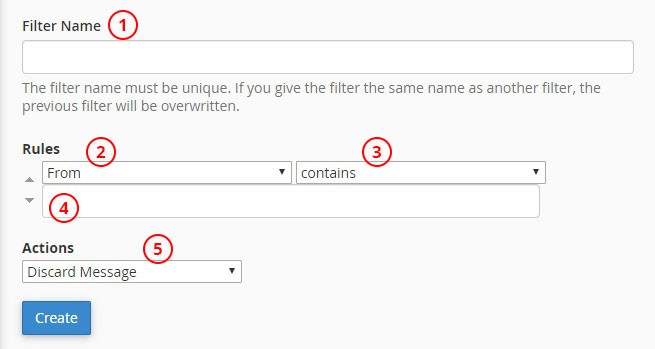
You may have to collate information on some of the spam you receive in order to configure rules that will filter spam effectively. Depending on the use case, a combination of rules can be to filter unsolicited emails and keep them from being delivered to your inbox. On the next screen, we can now start setting up the filters by filling the required information in the fields as shown below.

Using Filter Rules
Email filter configuration comprises setting up the filter name, rules and actions for messages that match your criteria. The first set of rule options allows you to specify the part of the email that will be examined to determine if it matches the criteria of the filter.
Below are the available Rule options:
Option | Description |
From | The message sender’s address |
Subject | The message’s subject line |
To | The address to which the sender sent the message |
Reply | The address at which the sender receives replies |
Body | The message’s content |
Any Header | Any part of the message’s header |
Any Recipient | Any recipient of the message |
Has not been previously delivered | The system only examines messages that remain in the queue for delivery |
Is an Error Message | The system only examples error messages that an auto-response system sends |
List ID | The account’s mailing lists |
Spam Status | ‘Yes’ or ‘No’ value assigned to email messages by SpamAssassin to classify them as spam or not |
Spam Bar | Indicator of how strongly SpamAssassin identified the email as spam |
Spam Score | The score assigned to an email message by SpamAssassin based on its spam characteristics |
Once you’ve selected a rule for the emails to be examined against, you can select the type of comparison for the specific part of the email that you selected.
Below are the available Operator options:
Option | Description |
Matches regex | The message matches a regular expression that you define |
Does not contain | The message does not contain the defined string |
Equals | The message exactly matches a defined string |
Begins with | The message begins with the defined string |
Ends with | The message ends with a defined string |
Does not begin | The message does not begin with the defined string |
Does not end with | The message does not end with the defined string |
Does not match | The message does not exactly match the defined string |
Setting Criteria
After defining the filter rule based on the above options, you can now enter the appropriate condition to be evaluated in the text box. Click the “Create” button to save the rule, and all incoming email messages will be compared against it.
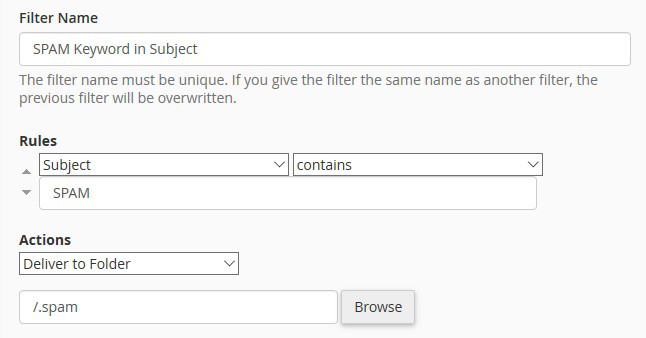
For example, if you select the Subject and Contains filter rules, you can enter Spam as the criteria. Any email messages with ***SPAM*** prepended by SpamAssassin in the subject will match the filter criteria.
Selecting Actions
You will want to do something with the emails that match the criteria of your filter rules. Messages will be processed with the actions you specify as part of your filter.
Below are the available Actions options:
Action | Description |
Discard Message | The system discards the incoming message with no failure notice |
Redirect to Email | The system forwards the message to another email address that you specify |
Fail with Message | The system discards the message and automatically sends a failure notice to the sender |
Stop Processing Rules | The system skips all filter rules |
Deliver to Folder | The system delivers the message to a specified folder |
Additionally, you can combine rules in the same filter using operands such as AND or OR. Your final email filter should look something like this:

While this is not an exhaustive guide on setting up email filters in cPanel, it gives you the basic knowledge on their usage and configuration. It is important to note that you can set up multiple filters and they will be processed in the order listed. You can also rearrange the order by dragging the filters from the Global Email Filters listing page.
Additionally, you may want to make sure your filters are not too aggressive and blocking legitimate emails. You can track deliverability using the “Track Delivery” option from the cPanel homepage. This will show you filtered emails along with other useful information like the sender, timestamp and spam score.
Do you have any favourite rules you use to filter spam emails? Share them in the comments below.

